Friday, August 31, 2012

The Butcher of Khardov

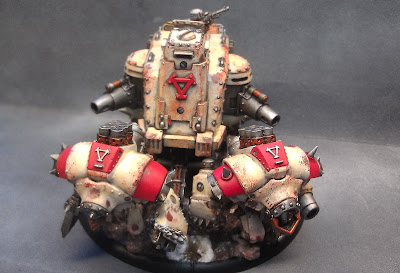
Finished this up as another piece for that never ending commission to go along with the Gun Carriage.
Tried a little different technique for the rust spots on his armor which ended up being very similar to how I do my silos.
Decided to add some blood to the axe and ground as a bit of an afterthought, I mean, what kind of Butcher would he be if he were wasn't covered in blood?
As a side note, I must say that this figure is a great sculpt! Very crisp details. Was a real joy to paint.
I'll have to grab one for myself and give my old, Original Butcher a break from the field. 


Tuesday, August 28, 2012

New Online Wargames Magazine worth checking out

Looks like some of the guys from the Dragon Painting forum have put together an awesome  gaming ezine that is definitely worth a download. Kinetic7
Focusing on some of the amazing Skirmish style games out there now. 
I've looked over it pretty extensively, and Ive got to say that I am very impressed.
Some really great hobby articles by very talented artists and a couple interviews with some of the best Miniature painters around.

Free to download, so why not go have a look!?


Sunday, August 26, 2012

Infinity: Señor Massacre finished

Well, I am very happy with how this guy turned out after all. I'm a bit sad I have to give him away at the tournament, but he should go to someone that will make sure he sees far more table time than I would.
I could not get this guys head to focus in any of the pictures....How frustrating!
The checkered Kitchen style floor was a bit of a leap but I am pleased with how it worked. I had originally just assumed I would go with grey blocks as the color for the ground but realized it wasn't going to work once his pants were all finished up.
Couldn't have him all melding into one color! 

Let me know your thoughts. Thanks for looking.


Wednesday, August 22, 2012

Infinity: Señor Massacre WIP

Been working on this guy for a week or so now. Need to have him finished by the end of this month as he'll be a a raffle drawing prize for our first local Infinity tournament.

I decided (along with the help of a friend) to challenge myself and do this guy yellow rather than copy the studio art directly. I'm sort of kicking myself now, yellow is a freaking hard color to paint well!
Even though its been a test of my patience, I'm fairly pleased with how he's shaping up now.

let me know what you think.


Saturday, August 18, 2012

First Tournament at gamers Asylum

Well, we had the very first Warmachine/Hordes  tournament at the Gamers Asylum.
Was a fairly tame tournament for a lot of the newer players with a 25 point limit and no reinforcements.
Up for grabs were the colossal coins but that didn't mean the Hordes players armies didn't arrive in force! I think it was split nearly 50/50 between the two systems. Surprisingly, Cryx, Cygnar, Skorne and Trollbloods were not represented, but we had Menoth and Khador coming out our ears! There were 16 people that showed, which was a great turn out for a new store!

First place went to a Menoth Harbinger player, second to Legion with Saeryn and third was an eKaya Circle list. Was a well run and fun tournament. 


Monday, August 13, 2012

Making Industrial silos

Wow! Already the 13th of August and I'm only two posts in for the month. Gotta love how time fly's when you're  having fun.......or just working like crazy!

I had a few requests to show how I did my industrial silos, so I thought I'd go ahead and write up a tutorial for them. 
 

 First step is to gather up your Materials. Here, I've scavenged parts from sprinklers, old printer parts, and random bits of PVC piping that I pick up from the Hardware store.
 I assemble everything with hot glue because it bonds extremely fast and strong. Ive also added part of a toy (yellow pipe)because I thought it looked cool and my son asked if I would use it on my next project.  :)


 Next, what you'll want to do is punch out a massive amount of rivets. I use Very thin plastic card and a 1/16th hole punch to make them. Apply them to the silo by stabbing each rivet with an exacto knife, and then dipping into a reservoir of superglue. Then you just hold the rivet to the desired spot for a few seconds and it should be stuck pretty securely.


 After you have applied a sufficient amount of rivets it will be time for the undercoating of rusty paint. any rust colored paint should do. I would advise against the real cheap stuff because the tape may peel it off in a later step. Paint big swathes of color in random spots all over the silo.


 Now that the rusty colored paint is applied, you'll want to attach randomly cut pieces of masking tape to the painted spots.  I lay out a long piece of Masking tape on my cutting mat and then use my exacto to hack it into odd shaped pieces. Try not to cut out square shapes if you can avoid it. Rounded and jagged pieces of tape will look more natural.
Make sure the tape only covers rust colored spots.


 You will need to buy a spray paint that specifically adheres to plastic or make sure to give it a proper priming first. The color of Spray that I liked for my silos did not have a plastic adherent type, so I just use my regular, white model primer before I apply the color. This will help avoid drips and having to use a ton of the colored spray.
 If you're stumped for a good color to pick, go have a look at a sewage treatment facility or construction site to get a good idea of what the real life stuff looks like. It could vary from an Aqua blueish colored to light tans, depending on whats inside.


 Now, once the paint is thoroughly dry, use a pair of tweezers or your exacto to pry up and gently peel off the tape to reveal the "rust underneath"


 Now comes the fun part. I add decals and printed placards to the silo to help with a sense of realism. The placards were just printed out from a "hazard sign" google search. I cut them out of the printer paper, dipped them in water and they stick very nice. The Decals came from various military model kits that I've collected over the years. Once they are dry (or mostly) give them a god shot of matte varnish so they don't come off in the weathering step.
I also jumped the gun here and started adding my dirty washes before I took the picture with just the decals.


For the final stage, I add washes of dark brown and the original rust color to the silo. make sure its nice and sloppy with drips and pooling all over the place. Once the washes are dry, I use a spare piece of blister foam to apply random scrapes and pocks to the entire surface. Just dip your foam in some of the (thicker) paint and dab most of it off on a paper towel. Then make quick, precise dabs randomly all over the place.
I added some some black MIG pigment to the tip of the pipe to show that it belched thick, black smoke at one time.
Seal with Matte varnish and you're done!
You could make quite a hoard of these things in an afternoon. Just keep your eye out for cool and unusual pieces of junk that could be used for similar projects.

Here's the finished product.


Sunday, August 5, 2012

Khadoran Gun Carriage

This thing has been sitting as a WIP for and age now. I started pretty gung ho on it, but once I got into the grueling little details and such, I lost my will to paint at all. Which is really not a good thing seeing as this was a commission piece.  The actual assembly and conversion of the piece was done by the owner. the Warjacks replacing the horses was a really cool idea in my opinion, but it definitely made the painting take longer than it otherwise would have.
Well, its all finished up now and I can say that I'm happy with the results.
I wanted to go for a totally messy war-torn scene, where the battlefield has been churned into a snowy, muddy muck. 

Thanks for checking it out. Let me know what you think.


Related Posts Plugin for WordPress, Blogger...